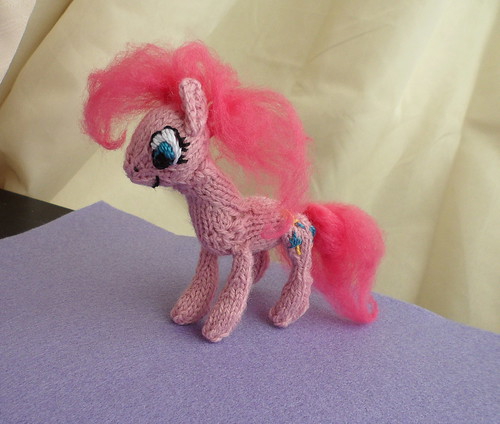
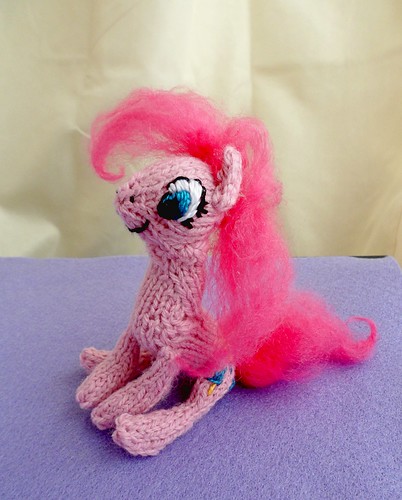
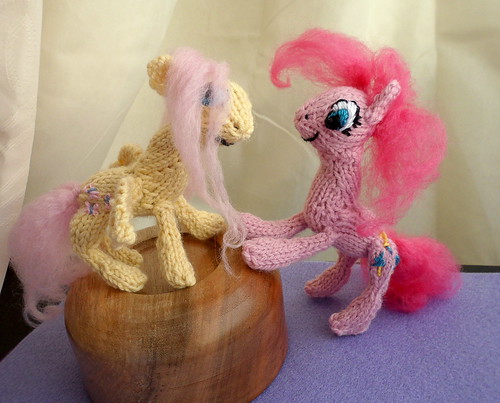
The cartoon My Little Pony: Friendship is Magic is surprisingly awesome. It's clever, has a good sense of humor, and features six strong female characters, each with her own very distinctive personality. On top of that, the art style is adorable - the characters were designed by Lauren Faust, who previously worked on The Powerpuff Girls and Foster's Home for Imaginary Friends.
You can make your own little ponies too, either for the little one in your life, or for yourself :) Though you do have to attach all the pieces at the end, each piece is knit seamlessly. The ears and wings are flat garter stitch, the legs are based on i-cord, the head and body are in the round, and the body is shaped with short rows. Then, finish it all off with some embroidery and an innovative way of making soft fluffy hair. Ponies are rather top-heavy, but they can easily stand up on their own with the help of some light wires hidden in the legs.
Mini Magical Friendship Ponies

Yarn:
Less than 100 yards of fingering weight / 4-ply yarn. Shown: Debbie Bliss Cashmerino 4-ply (yellow) and Sirdar Country Style (pink).
A couple yards of yarn for the pony's mane and tail. The yarn will be brushed out into soft, fluffy hair (see below). Any wool or acrylic yarn should work. Cotton is not recommended due to the short length of its fibers.
Needles:
Size US2.5 / 3mm DPNs
Size:
A finished pony measures about 4" tall (minus hair). They are just a little bit bigger than the plastic brushable ponies.
Materials:
Stuffing
Yarn needle
Embroidery thread in black, white, and colors for the pony's eyes and cutie mark
Some thin wire (mine is 24 gauge)
Crochet hook
A hand card, flick carder, or dog slicker brush for combing out the mane (see below)
Abbreviations
CO - Cast On
k - knit
p - purl
m1 - make one (increase)
tbl - through the back loop
k2tog - knit two together (right-leaning decrease)
k3tog - knit three together
ssk - slip slip knit (left-leaning decrease)
cdd - centered double decrease (slip 2 as if to k2tog, k1, pass slipped sts over)
sl - slip
w&t - wrap & turn
BO - Bind Off
Head
CO 4 sts. Join in the round.
Round 1: (k1, m1) around.
Round 2: m1, k1, m1, k3, m1, k3, m1, k1.
Round 3: Knit.
Round 4: (k2, m1) around.
Round 5: k2, m1, k1, m1, k3, m1, k4, m1, k2, m1, k3, m1, k1, m1, k2.
Round 6: Knit.
Round 7: k4, m1, k to last 4 sts, m1, k4.
Round 8: Knit.
Round 9: k3, k2tog, k to last 5 sts, ssk, k3.
Round 10: k3, k2tog, k3, k2tog, k2, k2tog, k1, ssk, k3, ssk, k3.
Begin stuffing the head as it is being closed up.
Round 11: k3, k3tog, k2, ssk, k2tog, k2, k3tog tbl, k3.
Round 12: k2, k2tog, k6, ssk, k2.
Round 13: k2tog, k2tog, k4, ssk, ssk.
Knit 2 rounds.
Break yarn and pull through all sts.

Ears (make 2)
CO 4 sts.
Row 1: Knit.
Row 2: k to last st, m1, k1.
Row 3: Knit.
BO.
Front legs (make 2)
CO 4 sts.
Work i-cord for 4 rounds.
Next round: k1, m1, k2, m1, k1. Do not turn.
Work 2 more rounds of i-cord.
Next round: k2, m1, k2, m1, k2. Do not turn.
Work 2 more rounds of i-cord.
Next round: k3, m1, k2, m1, k3. Do not turn.
Work 2 more rounds of i-cord.
Next round: k2tog 5 times, then break yarn and pull through all sts.
Back legs (make 2)
CO 6 sts.
Knit 1 round. Do not turn.
Next round: k1, m1, k4, m1, k1.
Work i-cord (or knit around) for 4 rounds.
Next round: k2, k2tog, ssk, k2.
Next round: k1, k2tog, ssk, k1.
Knit 2 rounds i-cord.
Next round: k1, m1, k2, m1, k1. Do not turn.
Work 1 more round of i-cord.
Next round: k2, m1, k2, m1, k2. Do not turn.
Work 3 rounds of i-cord.
Next round: k3, m1, k2, m1, k3. Do not turn.
Next round: k2tog 5 times, then break yarn and pull through all sts.
Neck & Body
CO 12 sts. Join in the round.
Knit 3 rounds.
Round 4: k2, m1, k2, m1, k4, k2tog, k2.
Round 5: Knit.
Round 6: k2, m1, k4, m1, k3, k2tog, k2.
Round 7: Knit.
Round 8: k2, m1, k6, m1, k2, cdd, k1.
Body short rows:
k1, k9, w&t.
sl1, p8, w&t.
sl1, k6, w&t.
sl1, p4, w&t.
sl1, k4, w&t.
sl1, p4, w&t.
sl1, k4, knit wraps with next st, w&t.
sl1, p5, p wraps with next st, w&t.
sl1, k6, k wraps with next st, w&t.
sl1, p6, p wraps with next st, w&t.
sl1, Knit around, concealing remaining wraps as you go. End of short rows.
Knit 1 more round, concealing all remaining wraps.
Next round: k2tog, k2, m1, k2, m1, k2, m1, k2, ssk, k2.
Next round: Knit.
Next round: k2, m1, k to last 2 sts, m1, k2.
Knit 2 rounds.
Next round: k4, m1, k5, m1, k to end. 19 sts.
Next round: Knit.
Next round: k1, k2tog, k13, ssk, k1.
Next round: k1, k2tog, k1, k2tog, k5, ssk, k1, ssk, k1.
Next round: k1, k2tog, k1, k2tog, k1, ssk, k1, ssk, k1.
Next round: k2tog to last st, k1.
Break yarn and pull through all sts.
Wings (optional, make two)
CO 3 sts.
Knit 2 rows.
Row 3: k1, m1, k2.
Row 4: k3, m1, k1.
Row 5: k1, m1, k4.
Row 6: k5, m1, k1.
Row 7: BO2, k to end.
Row 8: k4, m1, k1.
Row 9: k1, m1, k5.
Row 10: Knit.
Row 11: k1, m1, k6.
Row 12: k6, k2tog.
Row 13: BO2, k3tog tbl, k1.
Row 14: Knit.
Row 15: k1, k2tog
Knit 2 rows.
Row 18: ssk and pull yarn through final st.
Finishing
Weave in all BO edge ends (the CO edge ends will be used for sewing up). Stuff body firmly - the neck should not be able to bend.
Put a little stuffing into each leg if desired to keep them poofy. Attach front and back legs to body. Cut some lengths of wire slightly longer than the pony's legs, and thread them through each leg and into the body. This allows the pony to stand up.
Attach the ears to the head.
Embroider eyes, nostrils, and mouth onto head, and cutie mark onto back legs. Attach head to body.
Mane & Tail
My favorite way of making hair is by using brushed-out yarn. This creates a mane & tail that are more realistic than regular yarn hair, as well as having more volume and able to hold some simple styling.

First, cut some loops of yarn as if you were making a fringe - a length of yarn twice the length you want, folded in half. Hold the yarn in the middle by the loops, and gently begin brushing it out with a hand carder or dog brush - something with sharp sturdy metal bristles, not a regular hair brush. Start at the tips and work your way up. The yarn will begin to fray and become fuzzy. The plies of the yarn will break apart, and you will be left with a length of airy fluffy hair. Don't worry if a lot of fiber comes off onto the brush; that's normal. You should be able to brush out a maximum of 3 or 4 inches before it breaks apart. The length you can brush will depend on what yarn you use. Brush the yarn out until you have about 1" left of yarn in the center.
Then, take several loops together. Using a crochet hook, catch a stitch on the pony's neck or backside and pull the loops through, then pull the brushed out ends through the loops (just like making the fringe on a scarf). Pull firmly, then very gently brush out the section of yarn that hasn't been brushed yet. Repeat until your pony has a full tail and mane. Trim and style if desired.
I hope you enjoyed this pattern. I ask that you please not sell any ponies made from this pattern. Thank you!
~Joyuna

 The Grateful Crane Shawl
 Elven Slippers
 Russell Square Mitts
 Russell Square Tam
 iTouch Jumper
 Twisty Wristband
 Mawata Pulsewarmers
No comments:
Post a Comment